OIDC-based strong authentication setup
Introduction
This document describes how to activate OIDC-based strong authentication on a Linux server.
Preconfigured setups are provided for Signicat, Telia and Elisa.
Other service providers can also be configured, provided their OIDC implementation is compatible.
Typographic conventions
<this> denotes a variable value that must be replaced with your environment-specific information.
Requirements
- SSH access and root privileges on the server (on both nodes in a clustered environment)
- Access to D-Center with permissions for the instance being configured
- At least 3.24.0-1 version for SecAtGW-plugins and SecAtGW packages
- Use
rpm -q SecAtGW SecAtGW-pluginsto check the versions
- Use
- Basic Linux command line knowledge
Clustered environment instructions
If you are running a clustered environment, only execute the steps on the ACTIVE node, unless otherwise instructed. To check the current status of the node, run the d3status command. If the command outputs PASSIVE, switch to the ACTIVE node before proceeding.
1. Basic setup
These steps must be completed on both servers (ACTIVE and PASSIVE) in a clustered environment. You only need to perform them once when activating the service for the first customer instance.
1.1. Edit /etc/postmantis.conf
Add the following configuration under section ## ::Envelope Policy Section:
modify RCPT /\.GenericOIDC>/ /.s>/
Add the following configuration under section ## ::Other rules section::
if ($policy /GenericOIDC/) add HEADER:X-Policy GenericOIDC
1.2 Edit /etc/sysconfig/nftables.conf
Add the following lines at the end of the file
# for GenericOIDC
add rule filter output ip daddr <testserverIPaddress> tcp dport 443 ct state new accept
add rule filter output ip daddr <productionserverIPaddress> tcp dport 443 ct state new accept
1.3 Restart services
systemctl restart d3policy
systemctl restart nftables
2. Set up instance configurations
2.1 Edit /server/<instance>/config/config.cfg
Edit the file to match the configurations below
- In case other plugins are already defined, separate with a comma:
genericoidc,telia - Add any preferred languages to
GENERICOIDCLANG
PLUGINS genericoidc
USEPLUGINS 1
GENERICOIDCLANG fi,sv,no
2.2 Create configuration directories
Run the following commands
mkdir -p /server/<instance>/config/plugins/genericoidc
chown d3web.d3 /server/<instance>/config/plugins/genericoidc
chmod 755 /server/<instance>/config/plugins/genericoidc
cd /server/<instance>/config/plugins/genericoidc
cp -p /opt/Sec\@GW/plugins/genericoidc/config/* .
3. Make a contract with an identity provider
In this section, prepare files to be sent to the chosen identity provider.
At the moment, instructions are provided for Telia and Signicat only, but the following instructions can be applied for any compatible identity provider
-
Make a contract with your preferred identity provider
-
Provide OIDC return URL
https://<fqdn>/redirect.cgias part of the contract or in a provided management interface -
Run the following commands to set up keys for encrypted communication between your server and the identity provider
cd /server/<instance>/config/plugins/genericoidc
openssl genrsa -out key.pem 4096
openssl rsa -in key.pem -outform PEM -pubout -out public_encryption.pem
openssl genrsa -out sign.pem 4096
openssl rsa -in sign.pem -outform PEM -pubout -out public_signing.pem
chmod 660 key.pem sign.pem && chown d3sync:d3 key.pem sign.pem
-
Convert the PEM files
public_encryption.pemandpublic_signing.pemto JWK format using an online tool, for example: https://8gwifi.org/jwkconvertfunctions.jsp -
Pick your identity provider from below and follow the guide for setting up provider-side OIDC configurations
- Telia
- Signicat
- For both converted JWK keys do the following edits
- For public_encryption.pem add
"use": "enc", so the line starts as the following example{"use": "enc","kty":"RSA","e":"AQAB","kid":"39fda..... - For public_signing.pem add
"use": "sig", so the line starts as the following example{"use": "sig","kty":"RSA","e":"AQAB","kid":"39fda.....
- Then combine these keys in the format shown below and save as a file
public.jwk
{
    "keys": [
        {"use":"enc","kty":"RSA","e":"AQAB","kid":"39fda53e-b7eb-4216-af27-df68e8c2cc41","n":"4GnGex0x1KxInyh7EAQv-svo5wwn8Agbqpes17rfI5m9Nx8TV3a1MQoC9yqaTb-uezJ3gzljox8kNtGxkc1jy3WOTXm2JQcSRcXP4t2kOcgMraPZsAPHIkPwxikejMV8NL_tZ8ApTwq3pfbxEB8gujmEIwI3AzRU118MeweroLjo-sCm5kSNrzRNkzpSkZrRQ14EN27x9AyMSwfEpC_RL851fe7zPdBTHjkPdpZsnrxlLEoga_FAByV_XPfGt1QJQBU4JVukzKhfBD-c2KwHG9Lx8s5ZzxSpNRtgf8mEM28kcI99E9uWnDPl2S8jaFH4soSRXfZpPE4iSx4uOTqrwx8CI52Xocg7xlRONgJmLksG6rVuZTv8mk5JdO8v9w2TgQ452qU5OURk2DtJzj07gyV3APVUwmZ-LFanOtZWLz0G3JegM-UTuQiWGsM12YofsLr6wdcuquBss6JcR5hNjCnFgx-BVCPTsrgn3j84F3Z8eooUmlN86OBXss4zqH7iU_9SOmxlXqQC1l1qqMTZmVnXIn2jl_9zlPFwNsm71HxUrpOEIkBFBnjkU9JD-H1VJ_N7Fq0xvwbOv2e2WxZwg_MT8i3jFmpSDjQ0nrOQKmNmCBOIionGQCNbdEYK5lmWx3BMz6GL4MlVc_ik8zoZzA2w-yw6Xvfoqynam2XGxA8"},
        {"use":"sig","kty":"RSA","e":"AQAB","kid":"8f78ef3b-ae93-45a7-8f7a-5b6fee81dcb4","n":"w1SNwesCzz3qZbKf0V2qEKg_cE7hLdSLUs1pu9CIYLwcSG_APU1ZRUcXCqiSC5g71gpJB4ngW_l6D_1T4g1OYak32xo4UHzdWWIKJ8tvxPluvqY9vvD7uY_V1XqGRSzqY50gklCUg07HwxwWWFhELoJQBEJFTHBK1jQ4dX_4lq59rsc_yJNsrLQdf09NDVCUj6PEc02uxIO9gSAQZbZh_nYoV5CyHidFeg1ygMgQBq37Pv5HnC3NbpnNTn5c08tA6k5MnHQMD6zfppMNL6Mmq72tdbDzrBJx_rn-sCw_M1t5DD6WaG9W1SoackN6fUsh8Hi0PaEl9A9ENcUma2Irui2_kCMIzOtyOUbk9IDGce0TJyDUAAdmh2CaNf-zVa7F9UUH2_u_iwD2z2NgB4NwKqr8PMgaTVQJEOI6Dpu2cI1iY8RCXWX29EgfW77970IPJ9HTncoAS1bn1TfbG0HTxk0RV3QEfNdCVFoUbog94qafe0viMgzVvSinvBABRa__7i_1WubZ116cjzdYq4WzQB1A2jWBM5MCqHuXdmO5z53kU7KW7V1GiT8LyxUxTaMhYTVPooZmEDtlJ6xJvRDXm7nUB_gvKFrme7zK6_g-z2zFxvLM_1PdpsPdpsQm_By694FMf3bQbHW3WO8W91OmeCQEMOY8UyjNuXNhIFNLjc8"}
    ]
}
- Deliver this file to your Telia customer representative/support contact
You can either provide the keys (public_encryption.pem and public_signing.pem) to your Signicat representative as JWKs (public_encryption.jwk and public_signing.jwk), or if you have access to the Signicat management dashboard you can follow the guide below to set up the keys and settings yourself.
-
Login to the Signicat management dashboard https://dashboard.signicat.com/
-
From the sidebar navigate to Settings → API Clients → OIDC Clients → Press "Edit" on the client → Advanced → Public keys → Import public key
-
For the
public_encryption.pemJWK, add"alg":"RSA-OAEP", to the start of the key so that it starts with:{"alg": "RSA-OAEP","kty":"RSA","e":"AQAB","kid":"39fda..... -
For the
public_signing.pemJWK, import it as is, without the"alg"at the beginning:{"kty":"RSA","e":"AQAB","kid":"39fda..... -
Import each key in their appropriate usage modes
-
After importing you should have two items listed under public keys:

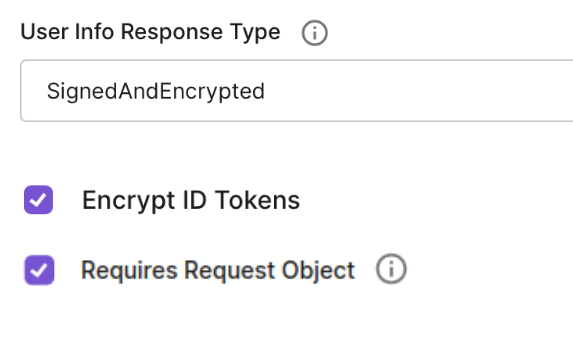
- Activate the following settings under OIDC clients → Edit → Advanced → Security
- After completing the identity provider specific actions, run the following commands to remove unneeded files from the folder:
cd /server/<instance>/config/plugins/genericoidc
rm public_encryption.pem public_signing.pem
- Sync
key.pemandsign.pemto the other node, if environment is clustered.
# Check the current node number with d3status command
d3status
# If the current ACTIVE node is "node 1", run the command as is. If current ACTIVE node is "node 2", then change s2 to s1 in the command.
rsync key.pem sign.pem d3sync@s2:/server/<instance>/config/plugins/genericoidc/
4. Activating OIDC
This section covers the following
- Edit the OIDC configurations and enable the preferred settings
- Disable
testmodeanddebugmode, and go into production (at this time, testing is only possible within the production environment.)
- Edit
/server/<instance>/config/plugins/genericoidc/genericoidc.cfg
Find testmode and debugmode and set both to 0
testmode = 0
debugmode = 0
- Find
templates_form,<provider>_jwt_privatekeyand<provider>_jwt_signkeyand replacedeltagonfrom the paths with the instance name. Also, make sureprivatekeyandsignkeyconfiguration values match the.pemfiles in the server disk
templates_form = /server/<instance>/config/plugins/genericoidc/genericoidc_form.html
<provider>_jwt_privatekey = "/server/<instance>/config/plugins/genericoidc/key.pem"
<provider>_jwt_signkey = "/server/<instance>/config/plugins/genericoidc/sign.pem"
- Choose which identifications are enabled by editing the
banksrow. Remove the identification methods you are not using
banks = ubilogin identityserver signicat telia
- Edit
<provider>_client_id,<provider>_client_secretfor the chosen identification methods with the<client id>and<secret key>provided by the identity provider
<provider>_client_id = <client id>
<provider>_client_secret = <secret key>
- Repeat for all chosen identification methods
Optional steps
- If you want to change the default text that will be shown in the user interface for users (e.g. Signicat OIDC), these can be changed by updating the value shown below
<provider>_servicename = "Signicat OIDC"
- If you want traffic to go out from the server through a proxy, define the proxy settings
proxy = proxyaddress:8080
5. Using OIDC in products
This section provides product-specific setup instructions. Follow the steps for the products where you want to enable strong authentication.
- D-Compose
- D-Envelope
- Secure Rooms
- Secure Forms
- Secure Sign
In D-Center, navigate under <instance> → Settings → D-Compose → Configuration and enable the following settings:
- Enable GenericOIDC-authentication
- Enable electronic authentication.
After completing these steps, the new GenericOIDC-rule will appear under the Access Rights page. This rule can be used to configure authentication for users accessing D-Compose.
On D-Center navigate under <instance> → Settings → D-Envelope → Configuration and enable the following settings:
- Type of identification to use when SSN is found in subject or header → GenericOIDC
After this, the new security level for an email will be used when sending email to an address formatted as recipient@domain.com.SSNNUMBER.s
You can enable GenericOIDC for invidividual users in the Secure Rooms user editor.
You can configure GenericOIDC as an authentication method for a Secure Forms form under the form-specific settings.
In D-Center, navigate under <instance> → Settings → secSigned → Configuration and enable the following settings
- Enable
OIDC-authentication - On D-Center navigate under instance → Settings → secSigned → Report templates. Edit templates and choose new signing method OIDC.
After completing these steps, you can use the new authentication method for signing documents.