Entra ID - Graph API setup
This document describes how to setup Microsoft Graph API for setting up Secure Sign, Rooms and Mail user syncing. After going through this guide proceed to the following guides for further product specific setup instructions:
Entra ID - Secure Mail user syncing setup
Entra ID - Secure Sign and Rooms integration
Items shown in bold text in the guide indicate parts where you have to note down information for later use. Save these values in a text document.
Configuring Graph API
- Log into Entra ID portal
- Search for and Click “Enterprise applications”
- Click “New application”
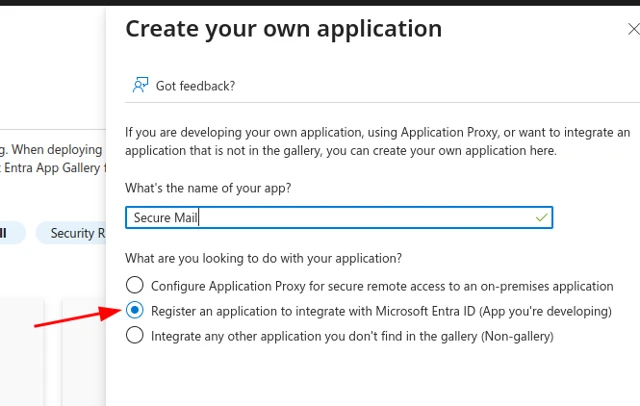
- Click “Create your own application”
- Name your Entra ID Enterprise app and Click the “Register an application…” option
- Set redirect URI settings to “Web”, add the Redirect URI
https://<FQDN>/redirect_uri(replace<FQDN>with your server’s fully qualified domain name), then click Register. Note this Redirect URI for later use.

- Return to the “Enterprise applications” view in Entra ID and refresh the application list if required
- Click the application you just created
- Copy the “Application ID” from the application’s overview page to your notes
- Click “Single sign-on” from the left menu
- In the “Configure application properties” box click the “Go to application”-link
- Click “Certificates & secrets” from the left menu
- Click “New client secret”
- Fill out the description and set expiration to at least 12 months
- Copy the client secret Value and Secret ID to your notes
- Click “API permissions” from the left menu
- Click “Add a permission” under “Configured permissions”
- Click “Microsoft Graph” from the list of APIs
- Click “Application permissions”
- Search for “GroupMember” and “User” permission groups and check “GroupMember.Read.All” and “User.Read.All“ permission checkboxes and click “Add permissions”
- Click “Grant admin consent for …“
- Search for “Tenant properties” in the Entra ID portal
- Copy Tenant ID to your notes
- Search for “App Registrations” in the Entra ID portal
- Click “Endpoints”
- Copy “OpenID Connect metadata document” value to your notes
- "OpenID Connect metadata document" will be used in an another variable called "OIDCProviderIssue". Value for this variable is "OpenID Connect metadata document" but without the ".well-known/openid-configuration" ending. Add this to your notes.
- Search for “Groups” in the Entra ID portal
- Create new group with Group type set to “Microsoft 365”
- Click “All groups” from the left sidebar and click the new group from the list. Refresh if needed
- Copy the group’s Object ID to your notes
- Click Members from the left menu
- Add required members to the group
Next Steps
After this guide you should have something similar to the following in your notes:
Step 6.    Redirect URI: https://example.com/redirect_uri
Step 9.    Application ID: 4290173a-9421-4eb6-acb4-03f2add15a5f
Step 15.   Secret value: QOY8Q~PUfWKuZOiwUynuKWMvyvZOm4Ve-nMWkcE_
Step 15.   Secret ID: db380eec-79aa-41d4-9e8a-3de5bd41238a
Step 23.   Tenant ID: 6e518c62-cf72-4239-bf34-c47959d688ac
Step 26.   OpenID Connect metadata document: https://login.microsoftonline.com/6e518c62-cf72-4239-bf34-c47959d688ac/v2.0/.well-known/openid-configuration
Step 27.   OpenID Connect metadata document for OIDCProviderIssuer: https://login.microsoftonline.com/6e518c62-cf72-4239-bf34-c47959d688ac/v2.0/
Step 31.   Group ID: fe6a70bc-00f4-4b60-8576-81bfae175578
Next proceed to setup either Secure Mail or Secure Sign and Secure Rooms Entra ID integration.