Entra ID - Secure Mail integration
Entra ID Graph API support brings user syncing to Secure Mail in the same manner as LDAP. For setting up user syncing to Secure Rooms and Sign, refer to Entra ID - Secure Sign and Rooms integration guide.
Before You Begin
- At least v3.26 of SecAtGW and D-Center must be installed
- You need an Entra ID subscription from Microsoft
Preparation for Setup
Go through the Entra ID - Graph API setup first to setup Graph API and prepare the values required for the following steps:
You should have a text document with something like the following after the previous guide:
Step 6.    Redirect URI: https://example.com/redirect_uri
Step 9.    Application ID: 4290173a-9421-4eb6-acb4-03f2add15a5f
Step 15.   Secret value: QOY8Q~PUfWKuZOiwUynuKWMvyvZOm4Ve-nMWkcE_
Step 15.   Secret ID: db380eec-79aa-41d4-9e8a-3de5bd41238a
Step 23.   Tenant ID: 6e518c62-cf72-4239-bf34-c47959d688ac
Step 26.   OpenID Connect metadata document: https://login.microsoftonline.com/6e518c62-cf72-4239-bf34-c47959d688ac/v2.0/.well-known/openid-configuration
Step 27.   OpenID Connect metadata document for OIDCProviderIssuer: https://login.microsoftonline.com/6e518c62-cf72-4239-bf34-c47959d688ac/v2.0/
Step 31.   Group ID: fe6a70bc-00f4-4b60-8576-81bfae175578
Replace the following in this guide with your server specific configurations:
<instance>= Your instance name on disk. Check under/serveron the server for your instance name for example for/server/examplethe<instance>would beexample<configname>= The filename for the configuration file on server disk that is used for saving the configuration details for Entra ID integration. Set the file name preferably without space characters. E.g.usersyncoruser_sync
Integration Setup
After finishing preparations go through the guide for Both Products first and then follow the steps for either D-Compose or D-Envelope to setup Secure Mail Entra ID user syncing support.
Both Products
- Access D-Center and navigate to:
<instance> -> Settings -> Sec@GW -> Entra ID Configuration - Write file name as
<configname>after “Or create a new configuration file” and press “SELECT” - From the above mentioned notes copy the following values to their respective fields
- Tenant ID: Tenant ID
- Client ID: Application ID
- Client secret: Secret value
- Group ID: Group ID
- Query filter: By default add
mailhere. In case you are going through “D-Compose SMS Registered Users”-section addmail,mobilePhone
- It’s recommended to setup a separate configuration for D-Envelope and D-Compose. If you plan to use Entra ID in both, go through the above steps again and set a separate name for the second configuration
D-Envelope User Access Control
This section sets up user lists for D-Envelope access control. Setting this up restricts the users who can send D-Envelope messages through Sec@GW.
- Open
/server/<instance>/config/envelope.cfgfor editing - Define file for
ALLOWEDLDAPSENDERFILEconfiguration e.g./server/<instance>/config/allowed_senders_ldap.txt - Access
<instance> → Settings → D-Envelope → Configurationin D-Center and set the radio button below “The manual list is always checked before LDAP-based rules…” to “Real-Time LDAP query” for real-time user fetching from Entra ID and “List file updated through a timed LDAP query” for slower updates. Save the configurations page. - Access
<instance> -> Settings -> D-Envelope -> User Access Controland pick the Entra ID configurations you want to fetch users with. You can pick multiple configurations by holding Ctrl while clicking. Save after changes and run “TEST QUERY” to confirm that the configuration file works. - The rest of this section applies only if you set anything other than “Real-Time LDAP query” in D-Center. It’s recommended to go through the next steps as well in case you want to switch the setting in D-Center.
- Copy the following script to server under
/rootasuser_sync.pl
user_sync.pl
#!/usr/bin/perl

BEGIN {
    require("/etc/opt/Sec\@GW/init.pl");
}

use vars qw/$documentroot $base_path $base_config_path/;

do("$base_path/lib/mailfunctions.pl");
do("$base_path/lib/components.pl");
do("$base_path/lib/validate_input2.pl");
do("$base_path/lib/readconfig.pl");

use File::Basename;
use SecAtGW::Instance;
use SecAtGW::InstanceUtils;
use SecAtGW::LDAPCrons;
use SecAtGW::FileHandle;

my $instances = SecAtGW::InstanceUtils::getinstances("dirname");

for my $instance_name ( @{ $instances } ) {
    my $documentroot = "/server/" . $instance_name;
    my $domainconf = readdomainconfig("$documentroot/config/config.cfg");
    my $envelopeconf =
readenvelopeconfig("$documentroot/config/envelope.cfg");
    my $composeconf = readcomposeconfig("$documentroot/config/compose.cfg");

    my $c = SecAtGW::LDAPCrons->new(
docroot=>$documentroot,domainconf=>$domainconf,envelopeconf=>$envelopeconf,composeconf=>$composeconf
);
    my $retval = $c->run_scripts;
    unless($retvall == 1){
        print $c->messages;
    }
}

sub print_log {
    my $val = shift;
    print $val . "\n";
}

sub error_log {
    my $val = shift;
    print $val . "\n";

}
- Run the script with
perl user_sync.pland confirm if the users added in the Entra ID setup guide have been added to/server/<instance>/config/allowed_senders_ldap.txt. If real-time option hasn’t been set, the file will be empty. - If everything seems to be correct, move
user_sync.plunder/etc/cron.hourlyand add execute permissions to the script withchmod +x user_sync.pl. - (OPTIONAL) Repeat step 7 on the passive server as well in a multi-node setup
D-Compose SMS Registered Users
This section sets up a registered SMS authentication user list for D-Compose. Setting this up allows Entra ID users to access D-Compose with SMS authentication.
- Access
<instance> → Settings → D-Compose → Configurationin D-Center - Find the configuration “Entra ID queries used to fetch email + telephone number combinations” and pick the Entra ID configurations you want to fetch users with. You can pick multiple configurations by holding Ctrl while clicking.
- Find the configuration “Retrieve email + telephone number combinations with an LDAP or Entra ID query” and set it as “List file updated daily” for slower updates and “Real-time query” for checking Entra ID users in real-time.
- Save the configuration page
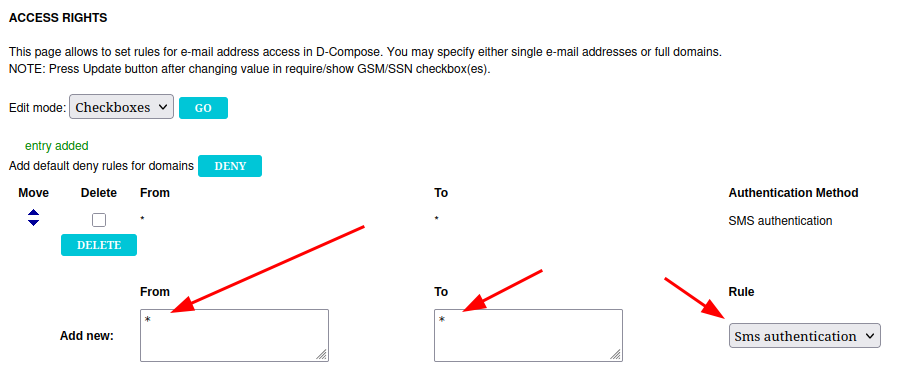
- Access
<instance> → Settings → D-Compose → Access Rightsin D-Center - Add the following rule to the list and press “ADD”. Optionally you can add any of the checkboxes on the right hand side:
- Access the server and open file
/server/<instance>/config/compose.cfgfor editing - On
LDAPGSMLISTFILEadd the following path after it:/server/<instance>/config/gsm_list.txt. Remember to replace<instance>with your instance name. - If you plan to use anything else except “Real-Time LDAP query”, follow the previous section “D-Envelope User Access Control” step 6 and copy the script to the server under /root. It’s recommended to copy the file in case you want to change the configuration later. The rest of this section’s steps apply only if you wan’t to setup real-time queries.
- Run the script with
perl user_sync.pl - Check
gsm_list.txtcontents under/server/<instance>/config/gsm_list.txtand confirm that the users set up in Entra ID have synced inside the file. If real-time query option has been set, the file will be empty. - The users should be listed in the following format:
user@example.com 040123123123 - If everything seems to be correct, move user_sync.pl under
/etc/cron.hourlyand add execute permissions to the script withchmod +x user_sync.pl. - (OPTIONAL) Repeat step 11 on the passive server as well in a multi-node setup
D-Compose Access Rights
This section sets up user lists for D-Compose access rights. Setting this up restricts the users who can send and receive email when sending email through D-Compose mail composing page.
- Edit the script below in step 2. according to the following
-
On line 13, replace your
<instance>with your instance name: e.g.
$conffile="/server/<instance>/config/gsm_auth_auto.txt";
to
$conffile="/server/example/config/gsm_auth_auto.txt"; -
On line 17, replace
<instance>and<configname>in the path with your instance name and the filename picked in section “Both Products” step 2: e.g.
push @conntest, SecAtGW::EntraID::entraid_search("/server/<instance>/config/entraid/<configname>.entraidconf");
to
push @conntest, SecAtGW::EntraID::entraid_search("/server/example/config/entraid/usersync.entraidconf");\
-
- Move the script to server under
/rootwith nameentraid_compose_access_rights.pl
entraid_compose_access_rights.pl
The script can be changed to your specific needs by changing the code as noted below:
On line 22, change the following line:
print $fh "* ".lc($line)." <reg> - 0\n";
to
print $fh lc($line)." * <sms> - 0\n";
The default line produces access rights rules like:
* → test@example.org - Registration
And the changed line produces rules like:
test@example.org → * - SMS authentication
#!/usr/bin/perl

BEGIN {
  require("/etc/opt/Sec\@GW/init.pl");
  require("/opt/Sec\@GW/lib/ldapsearch.pl");
  require("/opt/Sec\@GW/lib/d3db.pl");
}

use DBI;
use SecAtGW::EntraID;
$bin_path="$base_path/bin";
$status=`$bin_path/get_status.sh $base_path`;
$conffile="/server/devipannu/config/gsm_auth_auto.txt";

if (($status eq "ACTIVE") || ($status eq "ACTIVE FAKE")) {
    my @conntest;
    push @conntest, SecAtGW::EntraID::entraid_search("/server/<instance>/config/entraid/<configname>.entraidconf");
    if(@conntest) {
        open(my $fh, ">", $conffile);
        foreach my $line (@conntest) {
        chomp($line);
        print $fh "* ".lc($line)." <reg> - 0\n";
    }
    close($fh);
    } else {
        print "Connection test failed!\n";
    }
}
- Run the script with
perl entraid_compose_access_rights.pl - Confirm that
/server/<instance>/config/gsm_auth_auto.txthas been filled with the users you set up in the Entra ID setup guide. The list should consist of lines in the following format:* user@customer.fi <reg> - 0 - You should also see the same list in D-Center under
<instance> → Settings → D-Compose → Access Rights. - Remove the necessary default rules from D-Compose Access Rights so that the new rules take effect. The rules in
gsm_auth_auto.txtare processed after the manual access rights rules. - Open D-Compose to confirm that the setup works by accessing
https://<fqdn>/index.cgi(Replace<fqdn>with your server's fully qualified domain name) - Input any email address and go through the registration
- Add a random email address as recipient and press send to confirm that email can only be sent to the list fetched from Entra ID
- Try to add a legitimate email address fetched from Entra ID and press send to confirm that sending to the address works
- If all works as it should, copy the
entraid_compose_access_rights.plfile under/etc/cron.hourlyand add execute permissions to the file withchmod +x entraid_compose_access_rights.pl - (OPTIONAL) If in a multinode environment, repeat step 11 on the passive node as well.